How do I record acoustic drums? The must-knows for successful recordings

Let's get right into the thick of things: An absolute low budget solution for recording acoustic instruments would be to simply use your computer, smartphone or tablet and press "Record" in an appropriate app. This will save you a lot of effort and cost, as the internally installed mics and transducers will do all the work. The fact is that this way actually creates certain parts of even large productions. Lo-fi is a favorite "spice" of many producers, the contrast can then make the song really exciting. So can we save the rest of this special? No, because our goal is to record percussive signals of high quality and get the possibility to process several tracks separately.
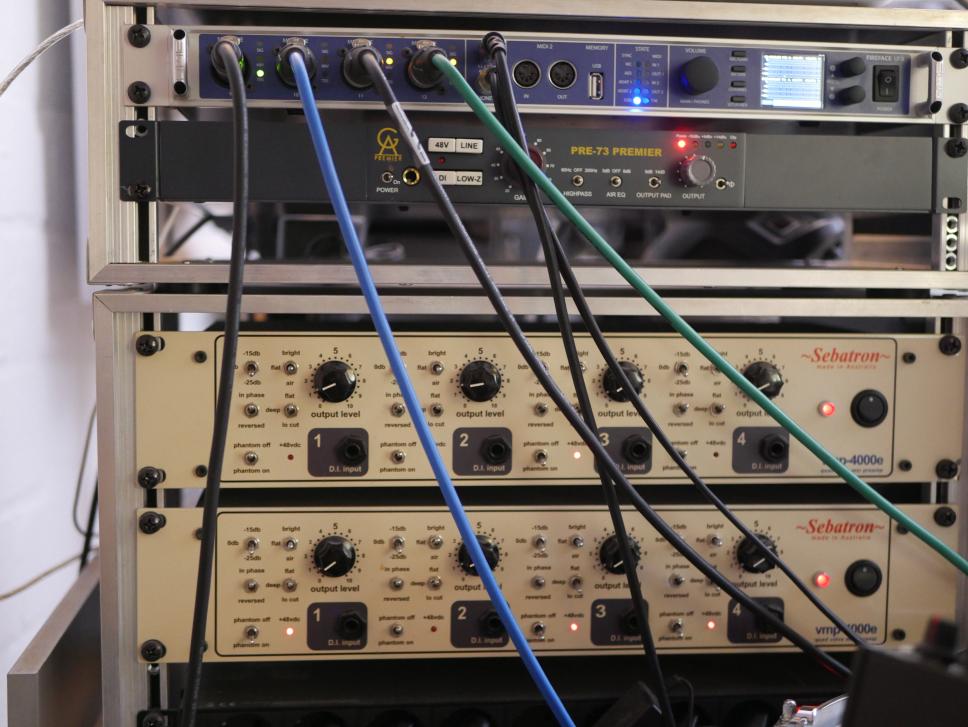
Audio interface with enough preamps
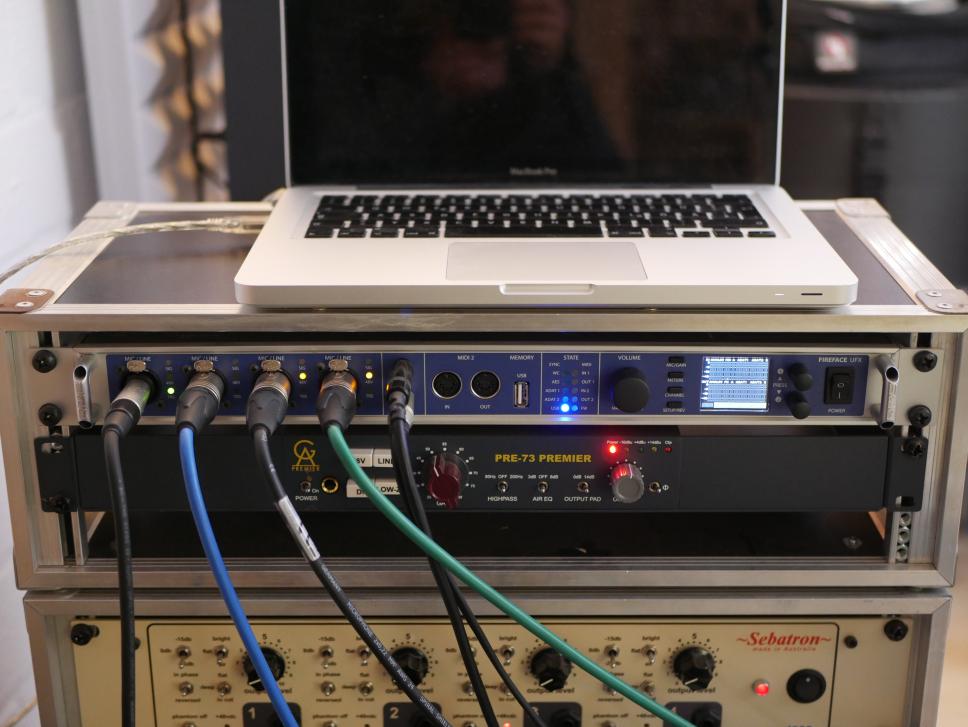
If you don't have one yet, you will first need a suitable audio interface. Generally, when choosing a device, the question arises as to how many microphones you want to record at the same time. For a complete drum kit, we recommend models with at least four, preferably eight built-in microphone preamps. Caution: manufacturers often state the maximum number of channels to be processed in their product descriptions. However, we are interested in the XLR sockets for connecting microphones. However, if you are primarily interested in recording individual drum tracks, one or two free preamps will suffice.
Now it's down to the nitty-gritty: the choice of microphones
In order to record snare drums and toms in the proper manner, dynamic instrument mics that can handle high sound pressures (SPL: Sound Pressure Level) have proven themselves. A classic here is certainly the Shure SM57, which has been used for several decades by producers of all styles for this task. However, almost all manufacturers offer alternatives that are just as suitable.
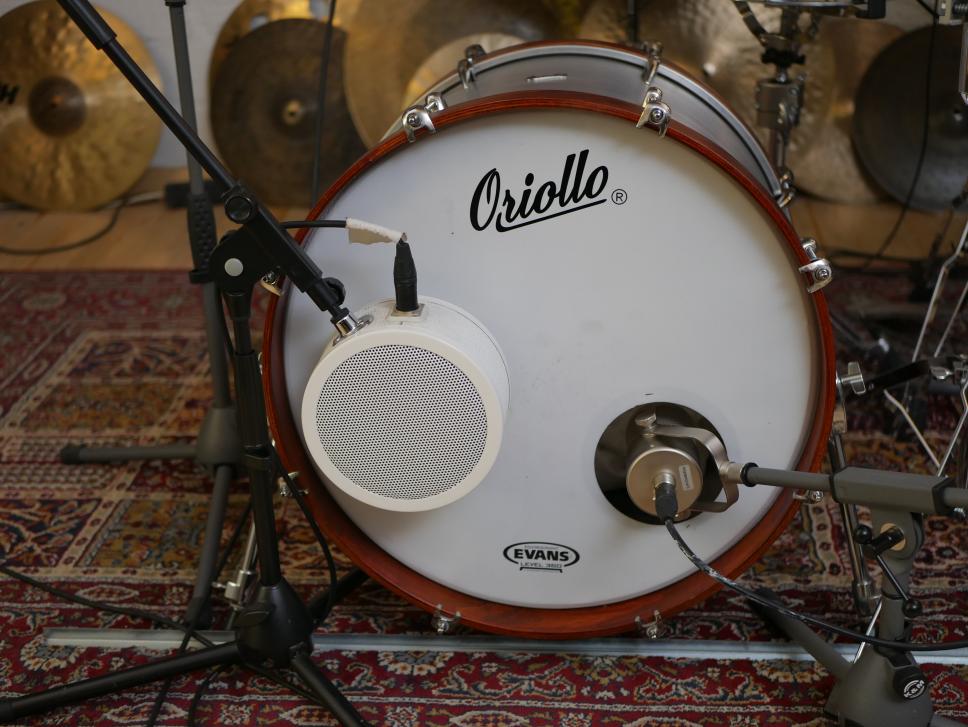
Bass drums: While snare drum and tom mics are usually versatile instrument mics that tend to have linear frequency responses, for bass drums drummers and producers like to use transducers that have been optimized by the manufacturer for this specific application. Models such as the Sennheiser e902 or Audix D6 have center-reduced frequency responses that emphasize the attack and low end of the drum and require less processing in the mix. Not absolutely necessary, but often a welcome addition to the regular bass drum mic are so-called subkick mics, which - placed in front of the resonant head of the bass drum - capture the very low frequencies of the drum. Technically, these are polarized loudspeakers whose mass inertia is conducive to the task. But vocal microphones are also often used in this position.
Overhead-Mikrofone
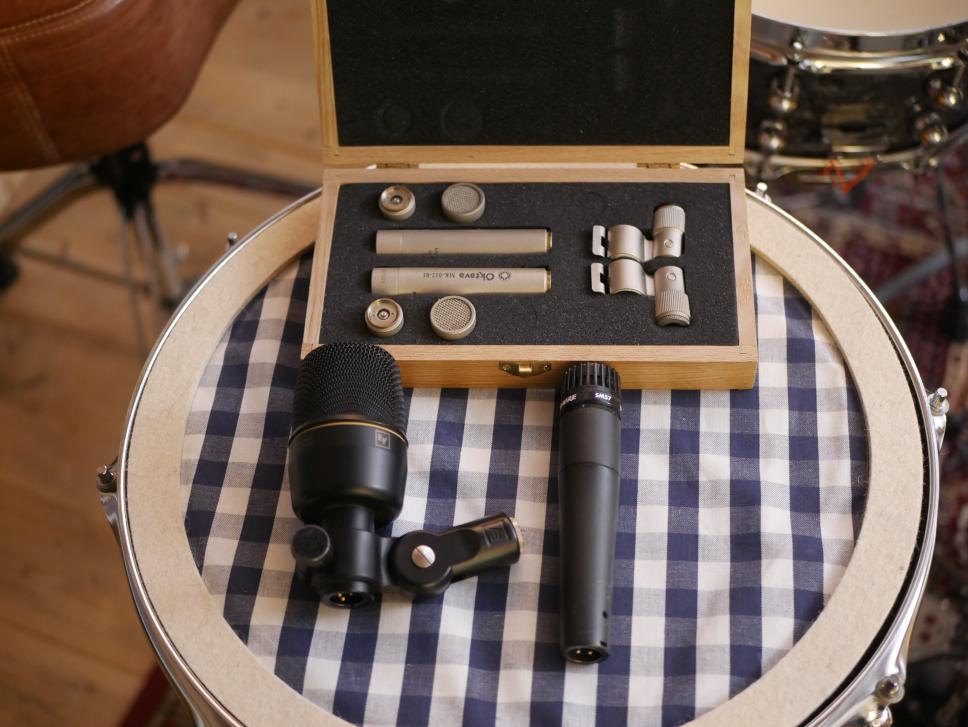
In many setups, overhead mics are responsible for imaging the entire drum kit, but some see them primarily as cymbal mics. The most common type for this application is probably the condenser mic. Whether these are small-diaphragm condenser mics in stick form or large-diaphragm mics is a matter of taste. For a softer, treble-reduced sound, ribbon microphones have also proven their worth. Expensive classics such as the Coles 4038 don't have to be expensive; even very inexpensive models can produce fat-sounding drum recordings.
Room and "dirt" microphones
Although not absolutely necessary, for many drummers the fun really begins with room mics. The type is secondary here, because the job of the room mic is to provide a signal that can be properly "pumped up" in the mix via compressor. Dirt" mics have a similar function, which are positioned at certain points in the kit to also generate more grip and/or tonal tension.
Good cables make life easier
Cables may not be really sexy, but without them things remain quiet. In addition, the right "strings" make life much easier, especially in drum recording. It starts with the appropriate lengths, which should be chosen so that all possible positioning options can be implemented without coming to cable limits or producing trip hazards. The quality is also important, because nothing is more annoying than having to check whether the cable is the cause of a problem. In our recording studio, we mainly use CPM FM cables from Cordial, which, with their good shielding and precise Neutrik connectors, make my daily work easier and last a long time at the same time. Also very practical is the possibility to get the cables in different colors, so you can see at a glance into which interface input which microphone signal runs.
Positioning of the microphones
In most cases, the miking of drums and cymbals is composed of so-called close mics and distant mics. As the name implies, the close mics are positioned close to the respective drums and cymbals. Optimally, they should only pick up the instrument to which they are directed; crosstalk from other instruments in the drum set and also room components should be minimized. This allows the sound of individual instruments of the drum set to be shaped precisely later in the mix. Our recommendation is to position the microphones about two fingers' width above the hoops of the snare and/or toms and to align the pickup axis approximately to the center of the head. The attack is most pronounced there, and harmonics are picked up less strongly in relation. For bass drums, the microphone is usually positioned in the drum or in front of the resonant head. The following applies here: the closer the microphone capsule is to the point of impact of the drumstick, the more attack the signal will have.
The situation is completely different with overheads and room mics. Due to their greater distance, they naturally pick up a much larger area of the drum kit and significantly more spatial components. You should keep this in mind when setting them up, because subsequent, targeted interventions in parts of the signal (for example, the snare drum) are much more difficult to accomplish. In order to achieve a good balance already during recording, it is important that both overhead mics have the same distance to the snare drum. We have found a distance to the center of the head of 90 to 100 centimeters to be good. If you want the sound to be more "tight" and less spatial, you can of course experiment with less distance, while a more open, wider sound is favored by higher positioned overheads.
The room plays along: The acoustics
Recording real percussion instruments is often referred to in the scene as the royal class of recording. The reason for this is obvious. Because unlike almost all other sound sources, the drum kit covers an extremely wide frequency and dynamic range. Both factors bring the acoustics of the respective room to the fore. Large studios for live music therefore have sound-optimized rooms with various, tuned acoustic elements such as absorbers, bass traps and diffusors.
Bass traps in all corners of the room bring an immediately audible effect, because they eliminate the typical "rehearsal room rumble" that results from bass and midrange "piling up" in the corners and making the recording intransparent and muddy. Here we are talking in particular about the frequency range between about 150 and 500 Hz. Depending on your budget and sound preferences, additional bass traps can also be positioned close to the drum set to eliminate the unfolding of these interfering frequencies directly at the source. The drier the (bass) sound is to become, the more heavy absorbers such as the aforementioned HOFA Acoustic Bass Traps are recommended.
Smaller broadband absorbers, which can be fixed to walls and ceilings, are another measure for shortening disturbing reverberation. Here, too, positioning the absorbers close to the sound source ensures that interfering highs and mids are quickly controlled and cannot build up into so-called room modes. Snare drums, hihats and cymbals benefit particularly from this, resulting in a more grippy sound and a natural relationship between attack noise and decay.
Diffusoren
To refine the sound and also to give the drum room a bit more liveliness, diffusers can also be installed. Instead of swallowing sound waves and converting them into heat (as absorbers do), they ensure that the sound waves are dispersed and thus prevent unpleasant bundling of the upper mids and highs.
We do not want to conceal the fact that such elements, especially in the sum, have their price. However, for all those who want to record acoustic instruments on a regular basis, investing in such measures is definitely recommended. One advantage of the modular design of HOFA acoustic elements is that not all parts have to be bought at the same time, nor should they be. Especially if the sonic neutrality of a mixing or mastering room does not need to be achieved, but a pleasant, inspiring tracking room is the goal. This gives time to get the ear used to change and to optimize the room bit by bit.

Additionally, it's worth experimenting with the position of the drums in your room to find the "sweet spot," the point where the recorded results sound best. Large rooms with high ceilings are advantageous for drum recordings, but depending on your sound preference, a smaller room will do as well. Most of us are bound to our rooms, so it's a matter of making the best of it.
Drum and cymbal selection
The most important percussive elements of most tracks are the snare, bass drum and hi-hat. It gets a bit more difficult when it comes to the question of which exact models and sizes fit best. In view of the enormous selection, we will limit ourselves to one tip: To begin with, take what is available, because exciting sounds can be generated from almost all functioning instruments. If nothing is available yet, the favorites would be a 20-inch bass drum, a snare in the standard 14x5 inch size and a hi-hat. When it comes to cymbals, quieter, dry sounds are recommended for recording. Especially in smaller rooms, thick "plates" with more volume and higher pitch can become a problem, because their sound then quickly overlays the rest. Long decay is also often not compatible with stronger compression. More on this in the mix section later. Many drummers today use kits with two to three toms, which is sufficient for most tracks.
Big drums with lots of drums and cymbals look cool, of course, but be careful to build up only what is needed in the song at hand. There are two reasons for this. The first is sonic, because percussion instruments tend to resonate quietly even if they are not directly struck. If a tight beat is needed, which is to be properly compressed in the mix, background noise would make the work much more difficult. The second reason for the reduction to the essentials is of a playful nature. What hangs on the drum kit is what you want to use. However, this often leads to the fact that the beat is supplemented here and there with playful "flourishes", which one would not like to have in it later.
Tuning basics and sound hacks
The subject of drum voicings often occupies drummers at least as intensively as the actual playing, because drums have the property of producing a whole cascade of overtones that don't always sound as desired. With whining decay, uncontrolled rustling of the snare carpet and floppy sounding bass drums, most are confronted at some point. We would like to introduce you to two good tuning approaches that have proven themselves in many situations: For example, we always tighten the tuning screws on the resonant head side of the snare drum extremely tight. Although this head is very thin, it can withstand extreme tensions and can perform its task best in this way. This includes not allowing the snare's sound to become too long and - very importantly - providing the snare carpet with as concrete a contact surface as possible.
You should adjust the carpet itself so that it responds when you tap the drumhead with your finger and so that there is a concrete, integrated rustling sound when you play with the stick. If it is adjusted too tightly, the snare drum will sound hard and stalled; if it is adjusted too loosely, the carpet sound will separate from the drum sound and rustle for too long. We tune the drumhead depending on the song, if it should be funky-dry, we tighten the tuning screws, for a "wet" disco or 70s sound, the head remains very soft. As a rule of thumb for all heads on the set, however, an even tension on all tuning screws is always a good starting point.
Another tuning tip
The second tuning tip concerns the sustain control of the bass drum. Its large head surfaces can often drive beginners to despair, because it is sometimes difficult to hear which overtones fit and which do not. The rule here is: what sounds exciting is good. To start, use a front head with a hole that is large enough to quickly place damping material such as small cushions or blankets in the shell. It is best to use some damping first and get a feel for the sound of the drum. Just as important as the decay of the bass drum is its attack. A hard bass drum beater, for example made of wood or plastic, provides more kick and punch, soft models made of lambskin create a soft, "boomy" sound.
Creative steaming and modification of the instruments
In its natural state, a correctly tuned drum produces a striking sound (attack) followed by a more or less prolonged decay (sustain or decay). The ratio of both sound components determines whether a drum is perceived as rather dry-percussive or open and tonal. The latter characteristic is especially appreciated in acoustic music styles such as jazz, but in other scenarios, longer-sounding drums pose a problem. Either because they take up too much space in the music or because their tonality does not match the key of the track. In recent years, the overall trend has been in a drier, more controlled direction, not least because such sounds are much easier to work with and fit into electronically dominated song contexts.
In addition to the drums and cymbals, we use a large arsenal of parts that can be used to quickly change and adjust the sound of the instruments. We distinguish between two categories here: One is damping; this is about limiting the natural drumhead vibration so that the length of the drum sound fits the flavor and/or the song. Our drummer hasn't played a single production in the last ten years that didn't use at least a bit of damping. Of course, there are many ready-made products to do this available in stores, but we often just resort to soft pieces of cloth, gaffatape, or cut-out old heads. The larger the damped skin area, the more limited the decay. Often, these short sounds are also the most "microphone friendly" because they provide a short pulse that can be shaped in the mix as desired. Also, fewer harmonics mean less crosstalk into other microphones.
The second category of things that can be placed on drumheads take away harmonics on the one hand, but add sonic textures at the same time. These include metal parts such as (sink) chains, all kinds of jingle percussion, key rings, screws, and really anything that can somehow be placed on the drumhead surface.
Very effective: the percussion tools!
Drums are played with sticks, in jazz there are perhaps brooms, the classics use mallets? If you look at it this way, you are depriving yourself of an enormous palette of possible sounds, which are also very inexpensive to implement and at the same time make mixing easier. Especially for those of you who want to build up a small arsenal of your own oneshots without investing a lot of money in drums, experimenting in this field is worthwhile. As explained above, the sound of drums is composed of the relationship between attack and decay. Hard percussion tools like sticks emphasize attack, while soft ones like mallets (felt or wool mallets) map the other end of the spectrum and focus on sustain. Brooms and so-called rods (made of bundled wooden or plastic sticks), on the other hand, add an airy character because the attack is split into many individual events here. But who says that we as creative sound tinkerers are only dependent on the products in the music store? Plastic tubes from the hardware store, whisks (great on ride cymbals), ballpoint pens, fly swatters and many curiosities more can be used as part of the sound production and often lead to great sounding, unique results.
The most important thing in drum recording: the sound in your head!
Drum recording should be a creative affair! However, one of the most important, if not the most important, prerequisite for a successful recording is a rough idea of how the final result should sound. After all, this is the basis for many steps that are taken during the process. We would therefore like to take you through a recording session, at the end of which you will have two beats: One with an open-sounding, punchy bass drum, high, dry snare drum with a bit of "sizzle" on top, and a compact, defined-sounding hi-hat. The second beat is characterized by an ultra-fat "disco-style" snare drum, a short, attack-heavy bass drum and a slightly wider, "crisper" hi-hat. The beat is loosened up by two dry muted toms and a so-called clap stack of bent cymbals, which is supposed to imitate an 808 clap.
Soundcheck
After you have miked the drums, it's time for the sound check. Since we don't have a sound engineer or separate recording and control rooms, there are two ways to do an acoustic check. One is to record something, then listen to it and make any adjustments to the microphone position. The other is to use a pair of headphones that are very closed, so that very little of what is being played comes through. Now it's time to set the microphone levels. Unlike in the past, where it was important to get the maximum level already on the tape, today in the digital world we can be very cautious. Digital clipping should be avoided at all costs, and signals that are too "hot" leave hardly any volume reserves for processing. A good value for all tracks is therefore about -16 to -12 dB. Your (interface) software usually provides good visual clues. If the signals constantly run into the red range, it is time to move the gain control counterclockwise.
The Mix - Step 1: "Clean up" and check phases
After recording, we have the recorded tracks in their raw form, with everything recorded by the microphones used. For a punchy drum mix, however, this can cause problems, because the signals from more than one microphone can overlap and/or cancel each other out. So the first order of business for all my mixes is to load parametric equalizers (every DAW has them) in all tracks and use low cut and high cut to filter out the unneeded frequency components. On the snare drum and the overheads, for example, we very rarely need frequencies below 80 Hz, especially when the toms have their own closemics, which then contribute the bass if necessary. On our two sample beats, for example, I used a subkick mic in front of the bass drum to contribute the low end. To prevent them from getting in the way of the signal from the main bass drum mic, I high-cut everything above 200 Hz on the subkick, and give the main mic a low cut below 70 Hz. The exact frequencies vary, of course, depending on tuning, mics and positions, but in the end it's always your ears that decide. There can be no fixed rules here.
Next we come to a very important point that many beginners do not pay attention to and thus ruin their recordings. We are talking about phase control. If the sound wave of the snare drum, for example, hits a single microphone, we don't have to worry. However, if - as in the case of the drum set - other microphones are responsible for imaging the drum, the sound waves are very likely to arrive at them with a time delay. In a good 50% of cases, this results in the cancellation of sound components, which makes the drum sound thin and hollow. The same is true for the toms and bass drum. We would therefore argue that one of the most important plugins is the phase switch. To control "what is phase", you should listen to all tracks at the same time and then press the phase reversal switch in the channel strip of the corresponding drum. If the sound becomes thicker and punchier, the phase was turned and you have successfully fixed the problem.
After you have implemented these first steps, the result should sound a bit more focused, punchy and transparent than the unprocessed raw version. Maybe a bit quieter, too (you removed frequency components, after all).
The Mix - Step 2: Basic Mix and Panning
![]()
So far you hear your tracks in mono, some instruments may also seem clearly too present. So now it's time to distribute the tracks in the stereo image and make a basic mix. The biggest effect is the panning of the two overhead mics. A hard right-left distribution opens the sound to the sides and provides a clear stereo impression. Whether you take the drummer's or the audience's perspective is a matter of taste. However, you should decide for one variant, because at the latest when elements like the toms are added, the picture should be coherent. Traditionally, the main components of the beat, such as the snare and bass drum, are left in the middle. But again, exceptions prove the rule. Now for the mix, let's briefly recall the part about close mics and distant mics. If you want a tight, drum-focused overall sound with more attack, it's a good idea to pull back the overhead faders a bit. If you want the set to sound more spatial and natural, pulling back the close mic signals will help. A common misconception is that all instruments in the set can be heard at the same volume. This may be true when it comes to documenting what is being played per se. However, this concept is no good as a creative template. Do you have to hear the hi-hat all the time, or does the track really open up when you just feel it and give maximum space to the snare or bass drum instead? These decisions are very important, so beginners should take their time to get a feel for them.
The Mix - Step 3: Compression, Reverb, Gates, Stereo Sum
The last step in the mix is often the most fun, because now it's time to "pump up" and add textures that make the result exciting and unique. An excellent tool for this is the compressor. Every DAW already comes with a corresponding plug-in and we actually recommend presets here to get started. The advantage is that they are very suitable as a starting point and you can quickly hear and see what effect the device unfolds. We use compressors on drums quite basically for two things, namely the shortening or widening of a (single) sound and for an equalization of the played beats. On the stereo sum, a compressor can also act like a kind of "glue" that binds all the elements together into a whole. Standard compressors usually have four important controls. The "Threshold" determines the signal level at which the device starts working. Next, the "Attack" knob determines how fast it will grab, while "Ratio" tells you how much compression it will apply. The "Release" knob sets when the compressor "releases" the signal again. If you don't have any experience with compressors on acoustic drums yet, I recommend the aforementioned presets as a listening guide. Very informative for the learning process is also the procedure of listening to the compressor on the stereo sum with extreme settings, for example with a "Room" preset. It is also fun to use compressor plug-ins whose mode of operation is summarized on a few knobs and whose purpose is not to work analytically, but rather to encourage intuitive decisions. (Example: Soundtoys Devil-Loc)
When compressing single tracks, it is important to make sure that crosstalk does not become too prominent. Depending on the signal source, gates can help here. To do this, first listen to the track in question solo. If, for example, the track is a constantly played snare drum backbeat without soft additional notes (ghost notes), a gate can isolate the beats and free them from crosstalk from the hi-hats. Then you can give compressors a good throttle, as they will only affect the desired sound events (in this case, the snare). The result can be very clear, punchy sounds. In the two example beats, we used this technique on both snares and bass drums to enhance the slightly electronic touch. But be careful: gates should not be obviously audible in the final result, so you should act carefully here. On tracks with longer decaying sounds, such as cymbals, they make the decay stop abruptly, which only really sounds good in very few cases.
Reverb plug-ins add sonic dimension to your signals. The more different you process your individual instruments, the more artificial the result will sound. A reverberated snare drum combined with dust-dry toms will have a more electronic sound aesthetic; after all, it's physically difficult to create such a sound behavior in reality. If, on the other hand, you place the reverb plug-in on the stereo sum, all instruments will be "placed" in the same space, and your beat will sound correspondingly more natural and realistic. Here the rule is: too much reverb blurs the sound, it is generally recommended to use this effect only in just audible doses.
Want more? Get more!


Subscribe to the digital edition of BEAT Magazine via Plugins-Samples.com and get more gear, in-depth workshops, reviews and 11 GB exclusive plugins and new sounds with every monthly issue!
Subscribe to Beat Magazine for only 4.99€ per month