15 tips for successful mixdowns

1 Hide nothing
If you are unsure about a sound and automatically mix it down, better leave it out altogether. Less is more. You should also consider whether the sound deserves a place in the track at all or possibly doesn‘t matter at all.
2 Repair or replace
Same applies if a sound does not work and has to be extensively reworked. If it is not the “mega rare, but incredibly individual” sound at all, you should rather save this time and look for an alternative. If the sound still doesn‘t sound good after 30 minutes, replace it.
3 Keep it clean
Keep the frequency spectrum clean and reserve the necessary space for all sounds. For example, with dance and club tracks, only kick and bass belong in the low frequencies. All other sounds can be safely EQ‘ed from 200 Hz downwards.
4 Cramped mix?
The fact that songs seem „big“ is rarely only due to the bass foundation. Rather, a mix becomes full and punchy when the spectrum is well filled. So don‘t get tempted to listen to kick and bass solo for a long time and want to make them fatter and fatter, because only in exceptional cases can the two elements later be heard alone. Only when hi-hats, snares and effects join in, the mix becomes rich and full.
5 Using panorama
Another feature for full mixes is the consistent use of the stereo panorama. The goal here is not to permanently fill every corner, but to distribute the sounds sensibly and play with mono and stereo parts. Classic example: In a breakdown, melody, pad and drum roll play together and use the full width in the mix. Midrange and treble-heavy instruments are found in the foreground, the bass range remains empty. Finally, when the mix continues, only kick and bass come in, both naturally mono. That change from maximum stereo width to the low-frequency mono part makes the drop all the more powerful.
6 Pimping weak sounds

If a sound lacks punch, you can use a distortion unit to let it intervene gently. A reliable candidate for roughening up is Studio One’s Ampire. Even with minimal DRIVE, a pleasant fullness and transparency in the sound is quickly established.
7 The three elements
The human ear can only perceive and locate three elements at the same time, such as drums, bass and a melody. So when arranging, make sure that you don‘t overwhelm the listener with too many elements, but create excitement through a sensible variety of different sounds.
8 Fix it in the mix!
If the mix doesn‘t work, mastering is not the solution you want. If in doubt, question the sounds you are using. Even though it can be frustrating at the beginning, if you don‘t reach the punch you desire: Always listen to your tracks in comparison with similar commercial tracks.
9 Make the sound visible
If some parts just won‘t fit into a track and the “three element rule” doesn‘t help either, it can be useful to convert the plug-in tracks to audio. This way, reverb tails, delays and decaying sounds become clearly visible. Under certain circumstances, this makes a mix that is too full recognizable. Besides, it also saves a lot of computer capacity, because you can then deactivate the originals.
10 Pause!
Don‘t forget your breaks & pauses! The ear tires quickly and gets used to the acoustic conditions. At some point you may want to make a fat mix even fatter, because the ear can no longer judge objectively. Or you think that a mix is nicer than it actually is. Pauses of 15-30 minutes will help.
11 Sidechain as spacer
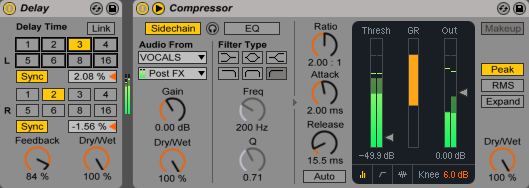
One of the classic ways to free up space in the mix is sidechain. Usually with the kick as the trigger for a compressor, which pushes the bass away when the bass drum is playing. But other elements can benefit as well. For example, if you want to add a lot of delay or reverb to a vocal track without blurring the transparency of the vocals. Load the delay or reverb onto a return track and place a compressor behind, with the vocals themselves as the trigger for the sidechain input. As a result, the echo or reverb will be suppressed exactly when the vocals are active, effectively avoiding sonic mud. You can then use the delay or reverb effect all the more intensively.
12 Know your tools
Even if this sounds simple, it’s immensely important: get to know your tools! Really! Although most equalisers, compressors or exciters work very neutrally, some of them include character. Especially the latter is usually a huge step towards the much quoted analogue warmth. But even apart from that, it’s important to know which tools are best suited for certain tasks. For example, one limiter can achieve a bit more loudness than another. Compressor A may be able to give drum loops a little more punch, but it fails when it comes to delicate work for vocals. So test your tools on different tasks to get a feel for which applications they can score on.
13 Analogue touch
Do you own an analogue mixer but are not actively using it for recording? Free it from its shadowy existence and route your audio tracks through the mixer. On the one hand, signals can be separated more easily in the analogue mixer, and on the other hand, it contributes a slight colouration after re-recording in the DAW. Or intentionally drive the tracks into overdrive. In contrast to digital and virtual mixers, the result is an official saturation of the signal instead of unpleasant scratching.
14 Keep the overview
If you can't find audio tracks in your song because of all the scrolling, it's time to get a better overview, otherwise the creative flow will be blocked in no time. Depending on the stage of the project, you should group tracks into categories, combine tracks that only contribute sounds now and then, or combine them on one track or in one folder. This way you will see if several sounds overlap at some points and be able to thin them out.
15 Dynamic compression
Usually every track has some passages with tension on peak. For songs this is the chorus. Compress your instruments more intensely during these sections than the rest of the project to create more density. The Studio One Limiter does a great job here. Combine the most important instruments into one group track, let the limiter pack down with -24 dB and activate it via automation only at the desired points. Make sure, however, that the output volume is not audibly higher when the plug-in intervenes.
Want more? Get more!


Subscribe to the digital edition of BEAT Magazine via Plugins-Samples.com and get more gear, in-depth workshops, reviews and 11 GB exclusive plugins and new sounds with every monthly issue!
Subscribe to Beat Magazine for only 4.99€ per month